 This year for Christmas, my hubby and I decided to build our twins a play kitchen for Christmas. After looking around on the web I discovered so many really neat kitchen built out of Ikea parts. We had so much fun building this kitchen and seeing the joy on our children's face on Christmas made it that much better!
We started off with 10 pieces of wood that we purchased from the shelving department at Ikea. Hubby finally got to use some power tools that have been sitting around.
 For the sink we used a metal mixing bowl and also our old kitchen faucet.
 He built a combo unit that includes a stove with pull out drawer which is pictured here, sink and cupboard section and also dishwasher.
 This is the dishwasher portion of the unit. The wire rack inside is a dish drain.

 Here is everything painted. We decided to paint the unit black and silver to give it a modern look. I used a retro looking fabric and some mod podge on the counter top to add some decor.
 I forgot to take before pictures of the fridge but here is an after. We splurged a little here and purchased magnetic paint to add a realistic feel to the fridge.

 A close up of the stove. Hubby added a piece of plexy glass to the stove a drawer underneath to store pots and pans in!
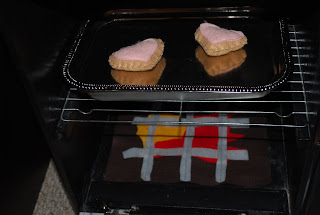
 A close up of the inside of the stove. We added a wire cookie sheet purchased from the dollar store to the inside of the stove. I also purchased some metal pans as shown for the kids to bake cookies on. Don't they look almost as good as the real thing?
The fire you see is a felt grill set that we received in a swap from Craftster.org. IT gives the stove a warm feeling to it!
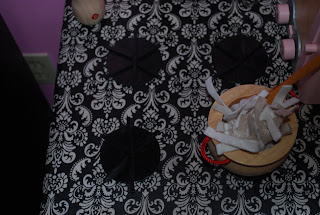
 Close up of the 4 burners and a pot of noodles cooking on top of the stove!
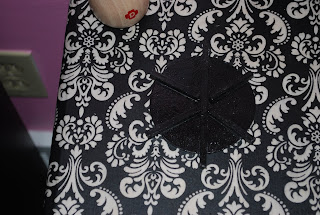
 A close up of the stove burner. I made these by painting a wooden circle purchased from the craft store black. I then added a square wooden dowel that hubby cut into smaller pieces. I super glued this down on top of the counter top.
 A close up of the sink and also another Pottery barn score!!! Wooden toaster marked down to 14.99 and then 50% off because it was a floor model!!!! The kids utensils are stored in a pencil cup from my office!
 I wanted some sort of a hanging rack so I painted wooden crates I purchased from AC Moore black and then screwed them to the wall. I added some hooks from my craft board and voila! I also filled the crate with felt veggies!
 Here is a close up of the counter top. I am LOVING mod podge!!! I used the hard version of it that is best for furniture! I really LOVING how this came out! The red board was purchased from Ikea. It is a sandwich plate but works here as a cutting board!
 This is a close up of the inside of the cupboard that is underneath the sink. I purchased a silver ware organizer from Ikea and filled the cupboard with all their dishes and baking supplies!
 the dishwasher!
 I LOVE this! A Pottery barn mixer. I lucked out here because it was the floor model and the last one they had. It was marked down to $20 and they took 50% off because it had a few dinges!!!
 This is the freezer. Hubby built shelves onto the doors. The kids have there felt food icecream displayed here.
 He also built shelves into the fridge. I love that they now have somewhere to store all their play food!
 Some close ups of the fridge. We added some handles that were purchased from Home depot.
 An itsy bitsy play food original cake coming soon to my Etsy store! I decided to paint the kids play table to match the kitchen set. It needed a bit of a face lift anyways. This table was also purchased from Ikea, it was originally white. I painted it black and added the fabric and mods podge to the seat portion of the chairs.
 I hope you enjoyed the tour of my little ones new kitchen!!! Please contact me if you have any building questions! Also be sure to check out my etsy store for some fabolous felt food. Mention you saw my blog and receive 20% off! Happy New Year!
This is brilliant! Saw it on Ohdeedoh - great work, I would have been in make-believe heaven with a set up like this when I was little!
ReplyDeleteLove, love, love it!
ReplyDeleteWow, you are inspiring! I can't wait to start one for my toddler!
ReplyDeleteI don't know how to get ahold of you but i would love to hear more about this kitchen!
ReplyDelete